So I ordered a bunch of part for basic maintenance and to fix my vacuum leak.
3x Mann oversized oil filter
1x Mann airbox filter
1x Mann filter
4x Denso IK20 iridium spark plugs
3x 1m OEM vacuum hose - from Concept 1 - $6.50 per meter!
Big maintenance will be done on Sunday. I will be doing the following;
-oil change with new magnetic drain plug
-replace spark plugs
-replace airbox filter
-replace cabin filter
-replace coolant hoses going to and from the oil cooler
-replace beat to shit/leaky/holed/cracked vacuum lines
-seafoam (pretty much injector clean)
Friday, January 29, 2010
Thursday, December 24, 2009
Hidden equalizer for Symphony radios
After switching my to my new symphony radio, I thought it sounded shitty, but then again, it did before.
I stumbled upon this great post, which unveils a hidden equalizer if you have a symphony radio, and it makes the sound system so much better.
From the post (http://www.audizine.com/forum/showthread.php?t=148602);
The following is the procedure on how to access and adjust the "hidden" equalizer feature in the Audi Symphony radio.
Some popular settings used are; 76567656 and 88698869. I used 76567656, I thought it sounded better, but I will play with it later when its not 3am.
I stumbled upon this great post, which unveils a hidden equalizer if you have a symphony radio, and it makes the sound system so much better.
From the post (http://www.audizine.com/forum/showthread.php?t=148602);
The following is the procedure on how to access and adjust the "hidden" equalizer feature in the Audi Symphony radio.
- Turn off radio.
- While pressing and holding the Preset 5 button, turn on radio.
- You'll see a series of 8 digits displayed. From the factory, it's set to "55555555". You will not hear any sound when running in this mode.
- The first four digits correspond to the four equalizer bands (low, low-mid, upper-mid, high) for the front speakers, and the last four digits are the same for the rear speakers. The level can be set from 1 (minimum) to 9 (maximum).
- Turn the volume control knob to increase or decrease the level for the band (which is blinking). To advance to the next band, press the P.Scan button.
- When you are done, turn off radio, then turn it back on to hear the results. On some versions of the Symphony, you must also cycle the ignition key to hear the results.
Some popular settings used are; 76567656 and 88698869. I used 76567656, I thought it sounded better, but I will play with it later when its not 3am.
Friday, December 18, 2009
MAF replacement.....no more rough idle....for now
Once you have bought yourself a new MAF because you decided that it would be a good idle to spray it with electric contact cleaner to try to fix a rough idle like me, here is how to install that bitch.
For this install, you will need;
-standard screwdriver
-philips screw driver
-new MAF (duh)
-30 minutes of your time
Let's begin;
The main intake box cover, you just pull up and its off. For the second part (the one with that accordion lookin thing), pull up on the left side and remove.
The red square boxes indicate what to remove/loosen. There are 3 clips holding the airbox cover to the airbox. The 3rd clip is below the top red box that physically holds the cover on, you can reach around the heat shield and unclip it (reach around...heh). Done. Ok maybe not so easy, that rubber thing with a wire going to it in the middle of the box connects to the MAF and is a bitch to remove/reinstall. So, I took the flathead screwdriver and jammed it in there to wedge it off. But isn't the MAF in thurrr? Don't worry young grass hopper, that shit is a down further, you are fine.
Disconnecting the MAF cable was a bitch for me, but probably could have been much easier. I fubar'd my MAF cable like I am sure many many people have done. It is super easy to remove once the rubber thing is off the airbox. Looking down on it while still installed in the airbox, there is a tab, pull that tab towards you, and it will unclip and bam! I was stupid and put the flathead in there to release it...yea that didn't work out too well.
Now remove the airbox cover, which will be annoying because there is a fuckload of wires and shit around it, once that is done, you get this. There are 2 screws holding the MAF assembly down.
New MAF. Take those covers off before install otherwise bad shit will happen. Although, you have my props for installing it if you still have both covers on and its installed. Hahaha. Seriously....bad shit.
Remove the MAF assembly by just pulling it apart, and place new MAF in. Do not forget to remove the rubber gasket on the old MAF. You have to put that rubber gasket on the new MAF. This gives the MAF to airbox a tight seal. Don't do what I did and notice it after everything was back together.
Reinstall everything in reverse order.
Now I have a smooth idle....that is...for now lol. I also checked inside my intake tube that connected to the airbox....oil! Probably from the valve cover gasket leakage. I am actually not too worried about it because it is after the MAF and there is no oil in the airbox itself.
DIY silver corner bulbs & corner light mod
This is a quicky, I must have removed my headlights half a dozen times by now, but if you don't know how to remove the headlights, use this DIY http://www.audiworld.com/tech/ext5.shtml. It is a good idea to do the DIY silver corner bulbs then do the corner light mod so the bulbs can dry.
It should take an hour or less for both DIYs if you include drying time.
DIY silver corner bulbs
You will need;
-chrome or silver spray paint (has to be durable enough to withstand a little bit of heat, high temp paint is not necessary because I don't think the corner bulbs will get to hot).
-empty kleenex box
-masking tape
-gloves
-scissors
-alcohol
Once the headlights are out, remove the bulbs and clean the glass part with alcohol and let dry for a minute or too. With the gloves on, tape around the leads of the bulbs so you don't end up painting those. You only want the glass part of the bulbs to be exposed. Have your empty kleenex box upside down and cut 2 stripes in it apart from each other so you can place the bulbs in there, which the bases in the openings so they stay in place. Shake the spray paint and do a single LIGHT coat so the bulb is covered in paint, but still can give off light. To check it, just place the bulbs under direct light like a flashlight and see if you can kinda see through it. Let dry and start on corner light mod.
Much better
No more egg yoke!
DIY corner light mod
I used this DIY; http://www.audizine.com/forum/showthread.php?t=112882&highlight=turn+signal+mod
Very easy.
Here is a comparison pic
Tuesday, December 15, 2009
OEM Radio Replacement
You know, I probably should be studying for my exams, but fuck it.
So my headunit that came with the car is a little fucked, it would place CDs until track 11 perfectly, then on track 12 it would start to break up, and would get progressively worse. I also found that there was a buzzing sound coming from the unit even when off. If I hit the side of the center console, it would stop. Little to my knowledge, after replacing the unit, it is the climate control unit in the center console that is buzzing lol. Fuck. This install should take like 10 minutes or less, making the tools is however long it takes you.
I followed this DIY to make me radio tools; http://forums.audiworld.com/showthread.php?p=1600151
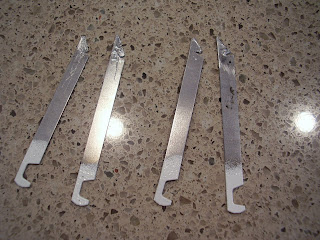
Ghetto tools that work
OEM radio removal tools are about $15USD. Just becareful when using the tools, it is a good idea to test them on the new radio to see how they work. The top clips have a little gap at the top, so the tool kept sliding past it and would not clip, so I had to play around with them to get them to work easy. Oh yea, these are from hanging folders.
Boxes from ECS Tuning
White box has the radio, brown box has the valve cover gasket and magnetic drain plug. Shipping was $48 USD!
OEM Symphony Radio I
So apparently, it is suppose to work and fit 100%
Ghetto radio tools at work
Yea....that shit doesn't fit....but it sure works
Mine on the left
Mine on the left
Or does it....
Just gotta switch the face plate
2 screws on each side and little clips at the top and bottom and off it comes
Just switch the face plates and pop it back in.
Working CD player past track 12!
Apparently, as you can see by the stickers on the radios, the new one is for an A6. The actual unit itself is the same one, just different face plates.
Simple install.
Saturday, December 12, 2009
Winter Driving
When I first bought the car, the previous owner put Goodyear Assurance 205/55R16 tires on it, while all seasons, they where pretty decent, but they have a lot of road noise.
So we get that massive snow fall Dec 4th, no problems get stuck, even with the all seasons. Bumper high residential snow, I can stop and go on hills, not a problem. Even when we had that night of ice rain, bitch just gripped like crazy going up hills on ice, on all seasons. Stop is a different story haha.
I finally got some used Pirelli Snowsport 210 winter tires in 205/55R16 for cheap, I feel they don't have much grip on ice, it seemed like the Goodyear's had better grip on ice. I have yet to try these Pirelli's in deep snow.
Even though the car is Quattro, which is front wheel drive based, it acts like a rear wheel drive car, the back end always kicks out, and some understeer is prevalent.
Some tips for Quattro driving: http://www.audiworld.com/tech/audi8.shtml
Friday, December 11, 2009
Rough Idle... ... ... .. .. ...
Alright, so minor issues....hahaha.
As per last post, a rough idle has many symptoms, here is what I checked first;
-MAF
-coil packs
-spark plugs
Replacement costs
MAF aka air mass meter/air mass sensor - $170
Coil pack aka ignition coil - $40 each
Spark plugs (OEM - platinum) - $16 each
Spark plugs (iridium) - $14 each
Mass Air Flow Sensor
-To test the MAF, what I was told on Audizine was to have the engine run, and then disconnect the MAF while it is running. If the engine goes smooth, then you need to replace your MAF. I thought I could save some dollas and get an electric contact cleaner to clean the MAF.....ha! That shit pretty much kill the MAF. My idle is wayyyyy rougher now. Thankfully I have a new MAF on the way.
Coil packs
To check this, you have to disconnect each coil pack one by one while the engine is running. If you disconnect a coil pack and the engine does not do anything, which it should shutter or something, then that coil pack is toast. That is what I found on Audizine. All my coil packs seemed fine, but since one was soaked in oil, and I hate the rough idle, might as well replace them all to get the car in tip top mechanical shape. You will be looking for the latest revision (revision "E").
Spark Plugs
OEM spark plugs are meant to last from 60,000 miles to 100,000 miles or 100,000 km to 160,000 km. Remember to get spark plug anti-seaze and torque them to 22 ft/lbs (accordinf to http://www.audiworld.com/tech/eng36.shtml).
Since my car has 180,000 km, they looked worn as they where never replaced.
Link from google of bad spark plugs: http://www.aa1car.com/library/reading_spark_plugs.jpg
Don't know what spark plugs to get? Read this: http://www.audigeeks.com/forums/index.php?topic=56.0
Oil leak!
The 1.8T is notorious for minor engine leaks and minor problems. Mine was leaking from the valve cover gasket, at the dealer it would be a $300 to $400 job. Fuck that shit. Its an easy DIY depending on your mechanical abilities. The part it self can be bought for $40 CDN!
My car has developed a rough idle which could be a few things; MAF, spark plugs, coil packs, oil leaking into coil pack cylinder which gets to the spark plugs. In my case, it is all over the above, haha. You can see in the pictures that there is quite a bit of oil in one of my coil pack cylinders.
Here is the link that I followed for my car, keep in mind, that different engine codes (ATW, AEB, AWM) are a little different.
http://www.audiworld.com/tech/index.html
This took me 1.5 hours because I got carried away when I cleaned the valve cover. Make sure you torque each valve cover nut to 10Nm, starting with the inner ones by the coil pack cylinders, then the outer ones criss-cross like how you would do you wheels.
Here it is....all 150hp/155tq of my A4, engine code ATW
Oil leaking at the valve cover gasket
Yup looks like it.
Progress - coil packs disconnected
Valve cover off
Cam chain tensioner - looks fine to me (source of ticking, aside for noisy valve lifters)
Oil in coil pack cylinder
What the coil pack cylinder is suppose to look like
It's a good time to clean off the current valve cover with a automotive degreaser. might as well clean both sides right?
Now the valve cover is super fresh and clean, and hopefully no leaks from it.
Clear corner mod
New Acquisition
Subscribe to:
Posts (Atom)